Don't you just love this type of furniture? Solid, functional, and versatile! Dressers especially are popping up all over the house holding everything from coloring books to linens to occasionally even clothes! The trick is to see one of these beauties and be able to envision it looking completely different with paint. Enter designer Karen Dunlap (
http://www.kmdinteriors.com/).
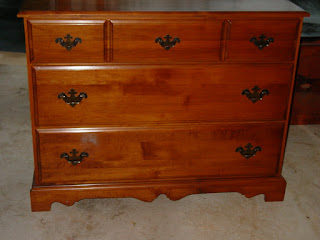 |
| Before |
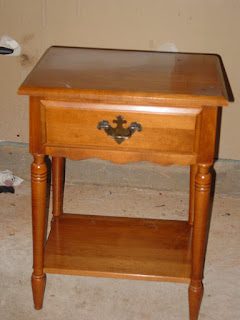 |
| Before |
Karen saw these two pieces in a distressed "Anthropologie" style for her clients daughter's room. Of course, the hardware needed to go (seriously, 15 years ago, did they have any other hardware for furniture besides these little black winged birdie looking drawer pulls???) At the end of this post, I am going to add a step by step guide to filling holes in your drawer so you can change the hardware.
The final color will be a Sherman Williams color called "Porpoise" - it's a lovely gray - but first I needed to fill holes, sand and prime the dresser and side table.
Karen provided me with a sample of the final finish she wanted on a small piece of wood and it was obvious that the wood showing through the distressed areas of the sample was not the same brown of the original wood on these pieces. I decided to have Benjamin Moore tint my primer to this brown, which has a bit more red in it than the natural wood of the furniture.
Another thing I noticed on the sample wood was that there were some whitish "aged" spots here and there. It was very subtle, so I decided just to add a bit of white satin paint here and there on the pieces so when I sanded it back, just a bit of the white would show.
It looks I frosted the edges!
After this step, it was just a matter of painting the top coat. I had Benjamin Moore color match the Sherman Williams Porpoise color (SW7047) in their Advance product. When the paint was dry, I took my sander and sandpaper to it to sand away areas that would normally show wear on an old piece of furniture; the edges, around the drawer pulls and corners. I guess I got a little carried away because I "over-distressed" it! I'm showing you the over distressed pieces so you know that you can always go back and fix it as I did. It's a lesson in standing back and taking a look at it every now and then.
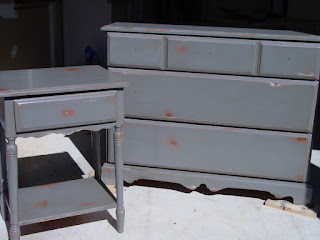 |
| Distressingly Over-distressed! |
Some areas I kept - can you see just the bit of white that came through on the drawers? Love that! I also love the reddish brown base coat against that gray. So I repainted the areas I felt were too distressed. When completely dry, I used a mix of burnt umber artists pigment and extender (extends the drying time) to age it further. Simply paint it on and gently wipe it off and the dark brown of the pigment will settle into the lines and creases, giving it an even more aged look.
Karen had to use her phone to take these shots for me as she was in the middle of the installation of the room, which is an exceptionally busy, sometimes stressful time with everything coming in at once. Thank you for taking a moment to take them for me Karen!
HOW TO FILL HOLES
You will need:
Small plugs the size of the hole (purchase at the hardware store)
Wood glue
Wood filler
Sandpaper or Electric sander (I use a palm sander)
Add a bit of glue to one of the plugs, making sure some of it goes over the edge and onto the sides. Gently tap the plug into the hole on the inside of the drawer, being very careful not to split the wood of the drawer. If your drawer starts to split, you likely have too large of a plug. Pull it out and replace with a smaller plug. Repeat in all of the holes.
I mean gently tap the plug in! Also, make sure you've protected the top of the drawer and you aren't scratching it against the floor or table while hammering the inside.
Plug should be flush against the inside.
Turn the drawer over and fill the hole with wood filler. There are many brands and I haven't found that one is any better than the other. You do want to make sure you don't keep the container exposed to air for any length of time - it's fairly fast drying.
You'll want to over fill the hole with the wood filler slightly and gently smooth the top out with your finger. Let dry.
After it's dried, sand it smooth.
Can you see the pit that formed in this one? That happens sometimes as it's drying. Just ad a bit more filler, allow to dry and sand again.
Holes filled, sanded and ready for a new hole to be drilled!


No comments:
Post a Comment